Overview
This document outlines the guide to create a chain with the purpose of reading a hardcoded array of JSON objects and write the data into a CSV file that uses a pipe (|) as the delimiter and includes a header row.
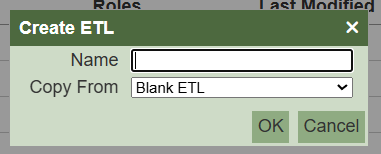
Step 1: Create a New ETL Container
Before creating the chain, you will first need to create the main ETL container that will hold it.
- Select the option to add a new ETL.
- The Create ETL dialog box will appear.
- Enter a descriptive Name for your ETL process (e.g.,
GenerateCSV). - Leave the Copy From field set to
Blank ETL. - Click OK.
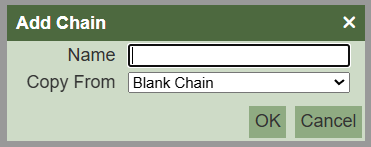
Step 2: Add a New Chain
Now that you have an ETL container, you must add a chain to it. The chain will contain the actual processing steps.
- Inside your newly created ETL, select the option to add a new chain.
- The Add Chain dialog box will appear.
- Enter a Name for your chain (e.g.,
GenerateCSVfile). - Leave the Copy From field set to
Blank Chain. - Click OK.
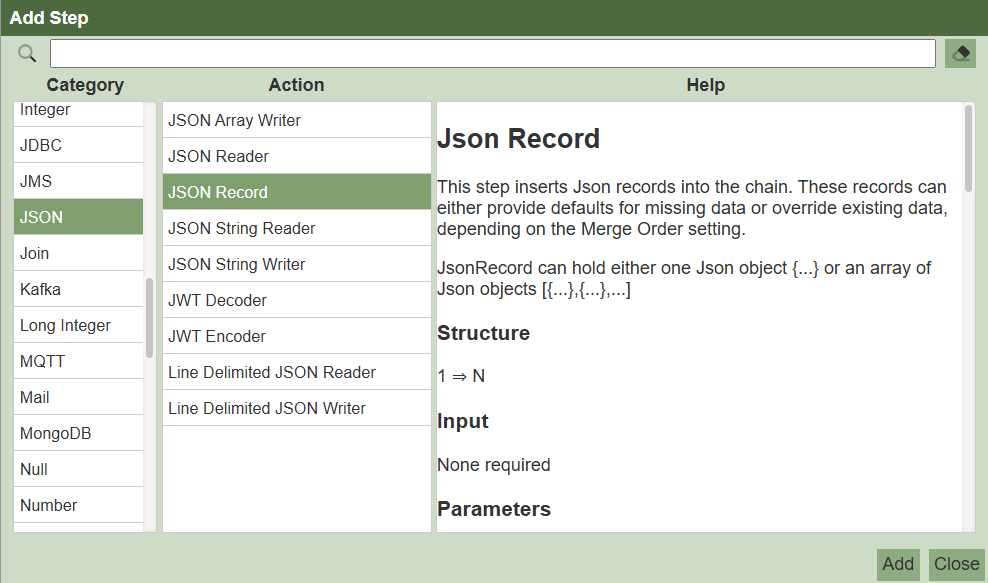
Step 3: Add and Configure the JSON Record Step (Your Data Source)
Next, you need a step to provide the data. We will use the JSON Record step to input a fixed set of data.
- In your new chain, add a new step.
- In the Category list on the left, select
JSON. - From the Action list that appears in the middle, choose
JSON Record.
- Click the Add button to add the step to your chain.
- In the configuration area for this step, paste the following JSON data. This will act as the source records for your CSV file.
{ "Col1" : "DataA1", "Col2" : "DataB1", "Col3" : "DataC1" }, { "Col1" : "DataA2", "Col2" : "DataB2", "Col3" : "DataC2" }, { "Col1" : "DataA3", "Col2" : "DataB3", "Col3" : "DataC3" } - Save the step.
Step 4: Add and Configure the CSV File Writer Step (Your File Output)
Now, add the step that will create the final file. This step will take the data from the JSON Record step and format it correctly.
- Add a second step to your chain, ensuring it comes after the
JSON Recordstep. - In the Category list, select CSV.
- From the Action list, choose CSV File Writer.
- Click the Add button to add the step to your chain.
- Configure the following parameters:
- Write Header: Check this box to enable it (
true). - Columns: List the column names exactly as they appear in your JSON, in the order you want them in the file.
Col1 Col2 Col3 - Write Header: Check this box to enable it (
- Separator: Enter the pipe character:
| - Filename: Specify the path and name for your output file, for example:
./data/out/CsvTest.csv
Step 5: Verify the Output
Save your chain and run it. Once the process is complete, navigate to the output directory you specified (./data/out/).
Attachments
- Sample Chainset
- Output File
GenerateCSV.chainset.zip (999 Bytes)