Overview
This entry outlines the steps to configure AWS Secrets integration and JDBC connection pooling in Ambience 2026 onwards using the Config Editor and Secrets modules. The configuration enables secure storage of AWS credentials and establishes a JDBC connection via HikariCP.
Step 1: Add AWS Secret Configuration
Before linking secrets, you must first define the AWS secret store.
a) Ambience 2026+
- Login into your Ambience 2026+ environment.
- Navigate to the
Config Editormodule. - Click
Addto create a new configuration section. Name the section appropriately, for example: AWS-Secret. - Add the following configuration:
ambience.secrets-store { factory { #mongodb = "ambience.secrets.CodexDBSecretsStoreLocation" #codexdb = "ambience.secrets.CodexDBSecretsStoreLocation" #hashicorp = "ambience.secrets.HashiSecretsStoreLocation" aws = "ambience.secrets.AWSSecretsStoreLocation" #azure = "ambience.secrets.AzureSecretsStoreLocation" } } ambience.secrets-store.location.aws = { type = "aws" enabled = true access = "xxx" secret = "xxx" region = "ap-southeast-1" is-addable = false is-linkable = true #role-arn = "arn:aws:iam::560978676821:role/iam-s3-allow-devops-acct-assume" #role-session-name = "xxx" sts-service-endpoint="https://sts.ap-southeast-1.amazonaws.com" } - Save the configuration and ensure it is enabled.
b) Repertoire 2026+
- Navigate to the
/etcfolder under the Repertoire 2026+ installation directory. - Locate the
application.conffile. - Paste in the following configuration:
ambience.secrets-store { factory { #mongodb = "ambience.secrets.CodexDBSecretsStoreLocation" #codexdb = "ambience.secrets.CodexDBSecretsStoreLocation" #hashicorp = "ambience.secrets.HashiSecretsStoreLocation" aws = "ambience.secrets.AWSSecretsStoreLocation" #azure = "ambience.secrets.AzureSecretsStoreLocation" } } ambience.secrets-store.location.aws = { type = "aws" enabled = true access = "xxx" secret = "xxx" region = "ap-southeast-1" is-addable = false is-linkable = true #role-arn = "arn:aws:iam::560978676821:role/iam-s3-allow-devops-acct-assume" #role-session-name = "xxx" sts-service-endpoint="https://sts.ap-southeast-1.amazonaws.com" } - Save the file.
Step 2: Link AWS Secret
Once the secret store is defined, link the AWS secret.
- Navigate to the Secrets module.
- Click Link.
- Configure the link by providing an appropriate Name, a Content ID, and necessary Access.
- Save the configuration.
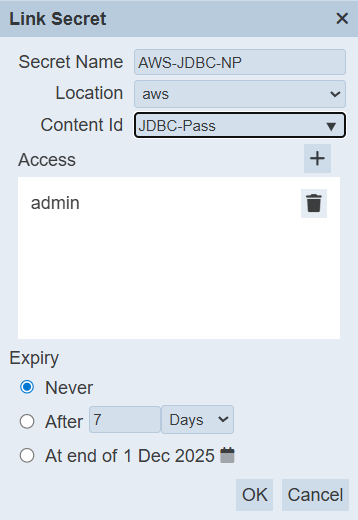
Note: The secret will appear as Not Ambience Controlled.
![]()
Step 3: Add JDBC Configuration
Proceed to configure the JDBC connection pool to utilize the linked AWS secret.
a) Ambience 2026+
- Return to the Config Editor module.
- Click Add to create a new JDBC configuration section. Assign a clear name to the section, for example: AWS-JDBC-CONN.
- Add the JDBC configuration details.
elixir.data.jdbc.connection-pool.definition { mysql { dataSourceClassName="com.microsoft.sqlserver.jdbc.SQLServerDataSource" dataSource.user="XXX" dataSource.password="{secret}AWS-JDBC-NP" dataSource.databaseName="XXX" dataSource.portNumber=XXX dataSource.serverName="localhost" dataSource.url="jdbc:sqlserver://localhost:52816;encrypt=true;trustServerCertificate=true" } # mysql-catalog-pattern = "" # mysql-schema-pattern = "" # mysql-table-pattern = "" } - Save the JDBC configuration and ensure it is enabled.
b) Repertoire 2026+
- Navigate to the /etc folder within the Repertoire 2026 installation directory.
- Locate the
hikari.propertiesfile. - Paste in the following configuration details:
dataSourceClassName="com.microsoft.sqlserver.jdbc.SQLServerDataSource"
dataSource.user="XXX"
dataSource.password="{secret}AWS-JDBC-NP"
dataSource.databaseName="XXX"
dataSource.portNumber=XXX
dataSource.serverName="localhost"
dataSource.url="jdbc:sqlserver://localhost:52816;encrypt=true;trustServerCertificate=true"
![]() Important:
Important:
dataSource.password must reference the linked AWS secret using the format: {secret}YOUR-AWS-LINK-NAME
Step 4: Finalize and Verify
- Restart the Ambience server for changes to take effect.
- Verify the connection:
- If the connection is successful, the Hikari Pool will automatically establish new database connections.
- If the connection is successful, the Hikari Pool will automatically establish new database connections.
