This example guides you through on the steps to retrieve the Ambience server’s user account details.
Contents:
- Creation of Datasource (Retrieving User Account Details)
- Creation of Datasource ( Retrieving User’s Last Login Date & Time)
- Creation of Report Template (Creating a Composite Datasource)
Creation of Datasource (.ds)
Retrieving User Account Details
Add a new Object Data Source.
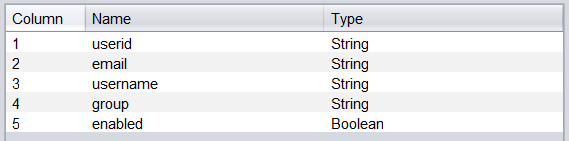
At “Enter datasource name and define the schema” section, add 5 new columns with the respective data types as follows:
At “View/Edit the JavaScript initializing the data source” section, add the following script:
    importClass(Packages.com.elixirtech.arch.job.JobLogging);
    importClass(Packages.com.elixirtech.usergroup.UserGroupUtil);

    function pushTo(/*PushContext*/ cxt, /*DataListener*/ dl)
    {
      JobLogging.logInfo("AmbienceUsers","Calling server");
      var users = UserGroupUtil.getUsers();
      JobLogging.logInfo("AmbienceUsers","Got " + users.length + " users");
      dl.startData(this);
      for (i=0;i<users.length;i++) {
        var rec = this.newRecordInstance();
        var data = rec.getData();
        data[0] = users[i].name();
        data[1] = users[i].email();
        data[2] = UserGroupUtil.getExtra(users[i],"userID","");
        data[3] = users[i].groups().mkString(",");
        data[4]=users[i].enabled();
        dl.processRecord(rec);
      }
      dl.endData(this);
    }
Click Finish once done.
Generate the datasource.
Retrieving User’s Last Login Date & Time
Add a new Object Data Source.
At “Enter datasource name and define the schema” section, add 2 new columns with their respective data types as follows:
At “View/Edit the JavaScript initializing the data source” section, add the following script:
    function pushTo(/*PushContext*/ cxt, /*DataListener*/ dl)
    {
      dl.startData(this);
      var info = com.elixirtech.v2.jobengine.bridge.UserGroupInfo.getLastLogins();
      var calendar = java.util.Calendar.getInstance();
      for (var i=0;i<info.length;i++) {
        var rec = this.newRecordInstance();
        var data = rec.getData();
        data[0] = info[i].user();
        var ts = info[i].ts();
        if (ts.isDefined()) {
          calendar.setTimeInMillis(ts.get())
          data[1] = calendar.getTime();
        }
        dl.processRecord(rec);
      }
  dl.endData(this);
}
Click “Finish” once done.
Generate the datasource.

Sample datasources for the above entry can be downloaded below:
obj_ds.zip (1.6 KB)
Creation of Report Template (.rml)
Creating a Composite Datasource for use in Report Template
-
Create a new Composite datasource.
-
In the “Designer” tab of the Composite datasource, add 2 DataSource processor and point it to the datasources created above respectively.
i.e. obj-user_accounts.ds and obj-user_login.ds -
Flow both the datasource to a Join Processor & configure it as below:
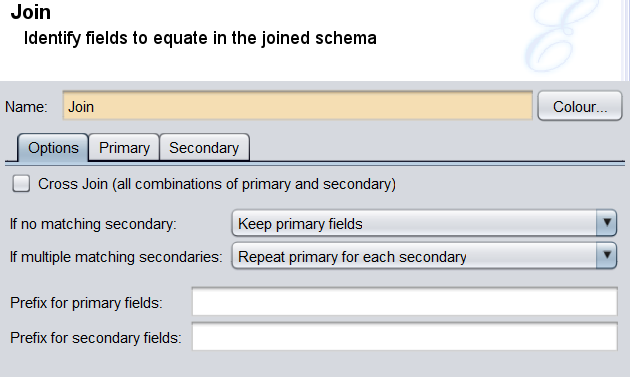
i.e. primary → obj-user_accounts.ds, secondary → obj-user_login.ds
–

-
Next, add a Processor.
-
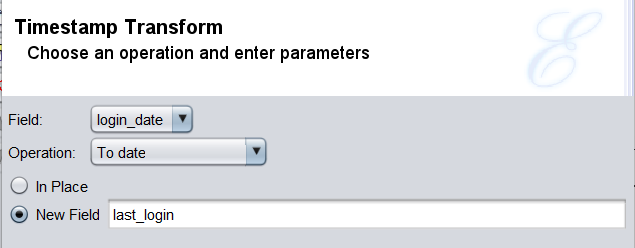
Configure the Processor as below:
Transform → “Add Timestamp transform type”
-
Next, add a Derivative Processor.
-
In the “Derived” tab, add a column with the below configurations:

-
Next, add a Processor.
-
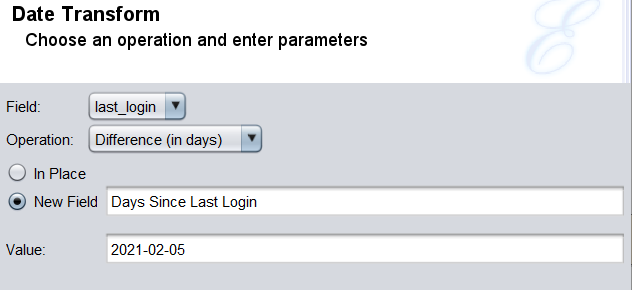
Configure the Processor as below:
Transform → “Add Date transform type”
–
Transform → “Add Discard transform type”
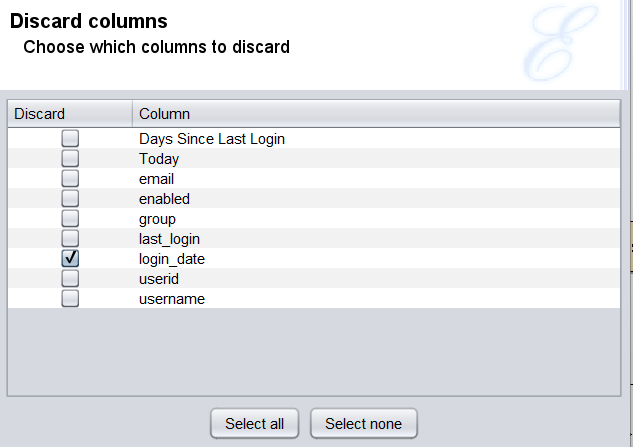
-
Flow it to Result and Save the Composite datasource.
-
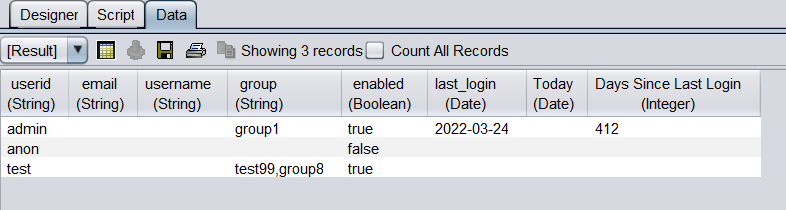
A sample output would be as follows:
-
You would than be able to utilize the composite datasource in your report template.
- Sample of the above composite can be downloaded here.
- Do upload the above sample to /ElixirSamples